image → parallax layers
Depth parallax wallpaper layers from your own image
* Free to use — the editor runs in your browser, and nothing is uploaded unless you start a server step: the AI tools, or upscaling a photograph (logos and flat artwork are enlarged on your device). A free account (Google, Apple or an emailed code — no card) is needed to download the finished file, and comes with credits for the server-side tools.
Wallpaper Engine's parallax effects move each layer by a different amount, which is what produces the sense of depth. That means the effect is only as good as your layers — and a flat JPG has none. This splits your image into a cut-out subject in front and a complete rebuilt background behind, at full resolution, as separate transparent PNGs you drop straight into a scene.
Layer a wallpaper imageHand-made layers versus a generated depth map
Wallpaper Engine gives you two routes to depth in a 2D scene. You can apply the Depth Parallax effect to a single image and drive it from a depth map, which its editor can generate with a neural network shipped as optional DLC. Or you can build the scene out of separate image layers and give each one its own parallax strength, which is the classic approach and the one that does not depend on a model guessing your geometry correctly. The generated route is fast and often good. The layered route is the one that stays under your control: you decide what counts as foreground, the edges are a real cut rather than a soft depth gradient, and the character's outline does not smear when the cursor moves.
Two layers, one click
Open the image and press Separate subject. The in-browser model is free and never uploads anything; the server model is 1 credit and handles hair, fur and fine edges better. Then press Fill behind, which reconstructs the background where the subject was standing so the back layer works as a complete picture instead of a silhouette-shaped hole — that starts at 2 credits, and a smooth background (sky, a gradient, a flat wall) is filled free in your browser instead. Export the Layer stack .zip and you have two full-resolution transparent PNGs, front and back, numbered in stacking order.
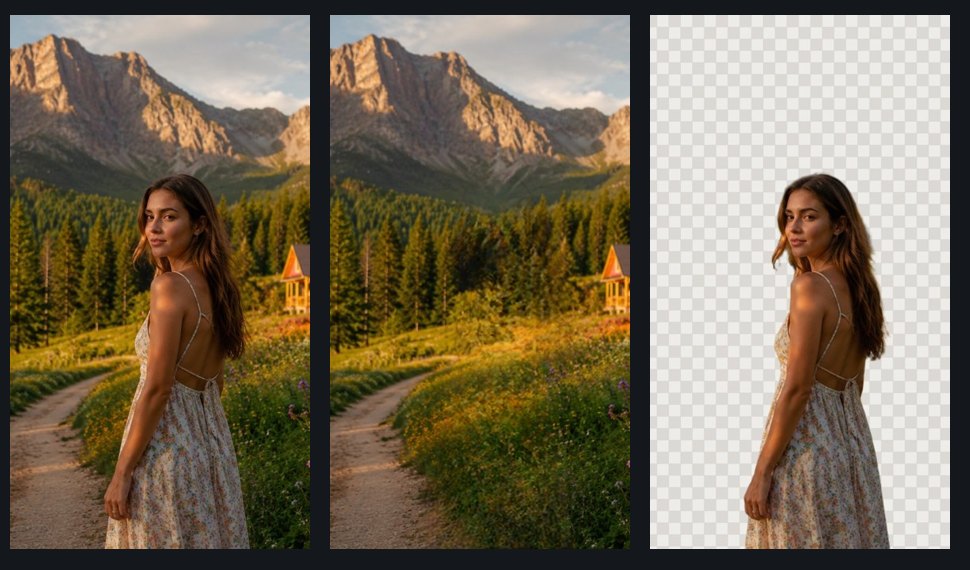
Building the scene in Wallpaper Engine
Create a scene at your screen resolution and place the back layer first, then the front layer above it. Select a layer, add the Depth Parallax effect from the Effects list, and set its parallax depth; repeat for the other layer with a different value, so the front moves more than the back. The scene-level parallax controls are Amount for overall strength, Delay for how much the layers lag your cursor, and Mouse influence for how much the cursor drives it at all — the useful trick is a small Amount with a noticeable Delay, which reads as weight rather than as a jitter. Because your front layer has genuine transparency, the background shows through around the subject correctly at every offset, which is the specific thing a depth-map version approximates.
More than two planes, for free
Depth reads better with three or four planes than with two, and flat-shaded art gives you them almost for nothing. Split by color puts every region of the same colour on its own layer in one pass with no AI involved, which on a lot of illustration means sky, distant hills, midground and character land separately. On painted or photographic art, click each depth band with AI grab instead and lift them one at a time, filling behind each as you go so the plane behind is complete. Then give each plane a slightly larger parallax depth as it comes forward. Split by color and the PNG-stack export are both free and uncapped, so a four-plane scene costs nothing but the fills.
Drawn art is where this earns its place
Monocular depth models are trained overwhelmingly on photographs, and flat cel shading gives them very little to work with — a character with no gradient across their coat and no atmospheric haze behind them is a genuinely hard case for depth estimation, and the failure shows up as a soft halo or a foreground that partially dissolves. Segmentation does not care about any of that: it is looking for the object boundary, which cel art draws explicitly. So for anime, game art and illustration, a hand-separated stack is usually the more reliable path. We are not going to put a number on how often depth estimation fails on drawn art, because we do not have one — try both on your own image, since the free path here costs nothing to compare.
About the iPhone lock screen, honestly
A lot of people arrive here from the iOS side, so it is worth being straight rather than helpful-sounding. iOS makes its own decision about depth, on the image you set, using its own on-device segmentation — we cannot influence that decision, and any tool claiming to unlock it is selling you something it does not control. Apple's documented requirements are an A12 Bionic chip or newer, a clear subject positioned near the clock but not covering it, and no widgets below the clock; the effect is lock-screen only and never applies on the home screen. What our layers can genuinely do is change the input: with the subject on its own layer over a complete background, you can move the subject down so there is clear space at the top for the clock, flatten that to a PNG, and set the recomposed image as your wallpaper. That fixes the most common documented cause — a subject that sits too high and covers the clock — and it is a real improvement rather than a promise. If iOS still declines, it has declined, and the wallpaper is still a good wallpaper.
Frequently asked
Does this work with anime and game art?
Yes, and it is the strongest case for it — subject separation works from the drawn outline rather than from shading, which is what depth-estimation models struggle with on cel art. Flat-colour art can also be split into three or more parallax planes with Split by color, free and in one pass.
Do I need the Wallpaper Engine depth-map DLC?
Not for this route. The depth-map generator is optional DLC needed only to create a depth map, and viewers of a wallpaper never need it either way. Building the scene from separate image layers with Depth Parallax applied per layer needs no DLC at all.
What resolution should wallpaper layers be?
Exports are always full native resolution, so start from an image at least as large as your target screen — around 1170×2532 for a recent iPhone, 4K for desktop parallax. Nothing is downscaled on export and nothing is watermarked.
Will this make the iPhone depth effect work on my image?
It cannot make iOS say yes — that decision is made on-device by Apple, on whatever image you set, and no third-party tool controls it. What it can do is fix the most common documented reason for a refusal: a subject sitting too high and covering the clock. Put the subject on its own layer, move it down over the rebuilt background, flatten, and set that image instead. Better odds, not a guarantee.
Is it free?
The in-browser subject split, Split by color, the smooth-background fill and all PNG-stack exports are free, unlimited and unwatermarked, with no account. The stronger server subject model is 1 credit, and a textured background fill starts at 2 credits — large or structured holes route through an HD pass that costs more, currently 6.
Does my image get uploaded?
Not for the free path — the segmentation model, the editor and the export writers all run in your browser, so nothing is transmitted. Only the optional server subject model and the textured fill upload anything, each labelled with its credit cost, and those copies are deleted within 24 hours.
Keep reading
Parallax planes for a 2D game backgroundSeparate a subject and keep the backgroundSplit any image into editable layersRelated
Separate the subject from the background, and keep bothPull the text out of an image — as text you can actually editMost "image to PSD" converters are fake. Here is the 30-second test.Free online color separation for screen printingSpot color separation, free and in your browserIndex color separation, and when to choose it over simulated processSimulated process color separation, with the override you will needCMYK separation for screen printing